 KeePass Help Center KeePass Help Center
|
 KeePass Home | KeePass Home |
 Downloads | Downloads |
 Translations | Translations |
 Plugins | Plugins |
 Donate Donate  Help Center Home | Help Center Home |
 Forums | Forums |
 Awards | Awards |
 Links Links |
 |
Import / ExportKeePass supports importing/exporting data from/to various file formats. |
KeePass 1.x supports importing data from CSV files (special form), CodeWallet, Password Safe and Personal Vault.
KeePass 2.x supports importing data from CSV files (all), KeePass 1.x (KDB, XML and CSV), KeePass 2.x XML, 1Password, 1Password Pro, 1PW, Alle meine Passworte, Any Password, Bitwarden, CodeWallet, Dashlane, DataVault, DesktopKnox, Enpass, FlexWallet, Google Chrome, Handy Safe, Handy Safe Pro, Kaspersky Password Manager, KeePassX, Keeper, Key Folder, LastPass, Mozilla Bookmarks, mSecure, Network Password Manager, Norton Identity Safe, nPassword, PassKeeper, Passphrase Keeper, Password Agent, Password Depot, Password Exporter, Password Keeper, Password Memory, Password Prompter, Password Safe, Password Saver, Passwords Plus, Passwort.Tresor, Personal Vault, PINs, Revelation, RoboForm, SafeWallet, Security TXT, SplashID, Steganos Password Manager, Sticky Password, True Key, TurboPasswords, VisKeeper, Whisper 32 and ZDNet's Password Pro.
For both KeePass 1.x and 2.x, there are plugins available that add more import/export capabilities.
- For KeePass 1.x:
- For KeePass 2.x:
- Generic CSV Importer
- Formats that require custom options/steps in order to be imported:
- Export: Option 'Additionally Export Parent Groups'
Unfortunately, there is no standard password database format. Every password manager uses its own file format. Anyway, almost all support exporting to CSV or XML files. This sounds good at first glance, but CSV and XML files are not specialized password database formats, they only specify a low-level layout of the stored data (for CSV: data fields are separated by commas; for XML: hierarchical form using tags). These formats do not specify the high-level arrangement of the data (for CSV: order/meaning of the fields; for XML: tag names and structure). Because of this, many users are confused when application #1 exports data to CSV/XML and application #2 cannot read the CSV/XML file, although it claims that it can read those files.
This help page details the expected CSV and XML file formats. Knowing the formats which KeePass expects, you can reformat CSV and XML files exported by other password managers to match the KeePass formats. CSV files can be reformatted using e.g. LibreOffice Calc (see below). XML files can be reformatted using an XML editor.
KeePass can import many password database formats directly (see top of this page). Additionally, there are specialized KeePass plugins available for importing more formats (like AnyPassword CSV, Oubliette files, PINs TXT, ZSafe files, and many more). Using these plugins, you do not need to manually reformat the output of other password managers; you can directly import the exported files.
If no import plugin exists for importing data from your previous password manager, feel free to post a request for it in the KeePass Feature Requests Tracker or in the Open Discussion forum.
 File Format: CSV (KeePass 1.x)
KeePass imports and exports data from/to CSV files in the following format:
"Account","Login Name","Password","Web Site","Comments"
The 'Account' field in a CSV file corresponds to the title field of a KeePass entry, 'Login Name' corresponds to the user name, 'Web Site' corresponds to the URL, and 'Comments' correspond to the notes. The CSV field names differ from the KeePass entry field names in order to ensure the compatibility with certain other applications.
For a detailed example, download this file:
FileSample_CSV.zip.
This file is zipped only in order to ensure correct encoding (if not zipped, browsers or
download managers could automatically convert the file to a different encoding). When importing
a CSV file, it must not be zipped!
Important notes about the format:
- The file must be encoded using UTF-8 (Unicode). Other encodings are not supported.
- CSV files only support the following fields: title, user name, password, URL and notes. Other fields like last entry modification time, expiration time, icon, entry file attachments, etc. are not supported. If you want to transfer such information, you have to use a different format (like XML).
- All fields must be enclosed in quotes ("). These quotes are mandatory, unquoted fields are not allowed.
- Quotes (") in strings are encoded as
\"(two characters). Backslashes (\) are encoded as\\. - Multiline comments are realized through normal line breaks. Encoding line breaks
by
\nis not supported.
Microsoft Excel by default does not enclose fields in quotes (").
It is recommended that you use
LibreOffice Calc
to create a correct CSV file (see below), or use the Generic CSV Importer
of KeePass 2.x (import your CSV file into KeePass 2.x, then export the data to a
KeePass 1.x KDB file), or fix the CSV file by manually adding the quotes using a text editor.
If you want to transfer data between KeePass 1.x databases, you must not change the default export options of KeePass. Do not export additional fields or uncheck any options, otherwise KeePass will not be able to re-import the CSV file, because it does not comply to the specification above any more.
Using LibreOffice Calc to create a CSV file:
LibreOffice Calc
can be used to create CSV files that can be imported correctly into KeePass. Follow these steps:
- Make sure you got 5 columns as described above.
- Select everything, right-click and select 'Format Cells'. In the dialog, choose Text as category. Click [OK].
- Go 'File' → 'Save As...', choose a location and the 'Text CSV' file type, and make sure that the check box 'Edit Filter Settings' is enabled. Click the 'Save' button.
- Choose 'Unicode (UTF-8)' as character set. The field separator must be set to a comma.
The text separator must be
". Make sure that the 'Quote all text cells' option is checked, and that the 'Fixed column width' option is not checked. Click [OK].
File Format: XML (KeePass 1.x)
This section describes the KeePass 1.x XML format. Note that this format is different from the XML format used by KeePass 2.x (anyway, KeePass 2.x can import KeePass 1.x XML files).
You can download a detailed XML sample file here:
FileSample_XML.zip.
This file is zipped only in order to ensure correct encoding (if not zipped, browsers or
download managers could automatically convert the file to a different encoding). When importing
a XML file, it of course must not be zipped!
Important notes about the format:
- The files must be encoded using UTF-8 (Unicode). Other encodings are not supported.
- The following five entities must be encoded:
< > & " '. They are encoded by< > & " '. - The UUID is a hex-encoded 16-byte string (i.e. an 32 ANSI hex character string in the XML file). It is unique (also across multiple databases) and can be used to identify entries.
- Dates/times are encoded in the standard date/time XML format (YYYY-MM-DDTHH:mm:ss): first the date in form YYYY-MM-DD, a 'T' character, and the time in form HH:mm:ss.
 Generic CSV Importer
KeePass 2.x features a generic CSV importer. This tool can import almost all CSV formats. The CSV files are loaded and you can manually specify the encoding / character set, assign columns to data fields, and specify how the low-level structure looks like (usage of quotes, etc.).
To start the generic CSV file importer, click 'File' → 'Import' and choose 'Generic CSV Importer'.
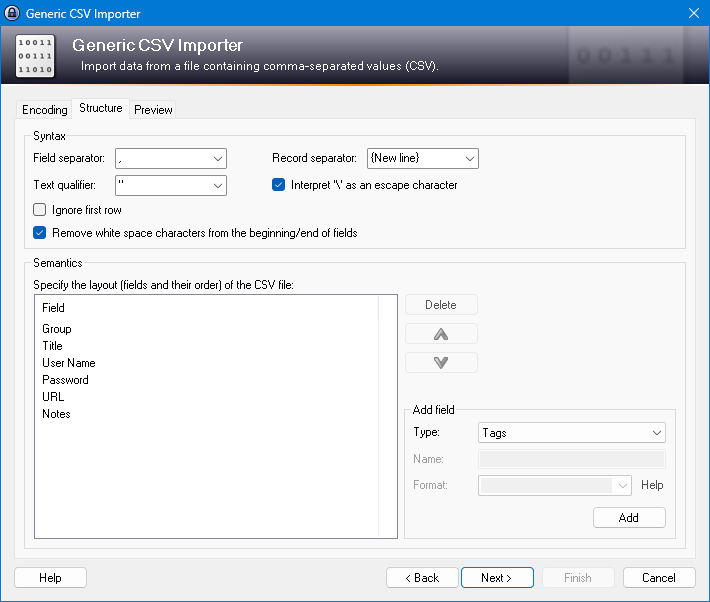
Details about the generic CSV importer (with descriptions of the options, examples, etc.) can be found on the Generic CSV Importer help page.
How to Import CodeWallet TXT
CodeWallet is a password manager that supports different card types (fields). KeePass cannot know which of the CodeWallet fields correspond to the KeePass standard fields (title, user name, ...), because they don't have fixed names (language-dependent, user-customizable, ...). Therefore all fields from the CodeWallet file are imported into custom string fields of KeePass entries. After importing the file, you can move some of the strings to the correct standard fields (by clicking the 'Move' button on the second tab page of the entries dialog.
How to Import PINs TXT
In order to successfully import a PINs TXT file, you need to do the following:
- Switch PINs language to 'English'.
- In PINs export dialog: Enable all fields.
- In PINs export dialog: Set separator to 'tab'.
- In PINs export dialog: Enable 'Quote texts'.
After exporting a TXT file using the settings above, import it using 'File' → 'Import' in KeePass 2.x.
How to Import Data from RoboForm
- In RoboForm, open the 'RoboForm Editor' (in older RoboForm versions, it was called 'Passcard Editor' or 'Edit Passcards'). Click the 'RoboForm' button at the top left (in older RoboForm versions, click the 'Passcard' main menu item) → 'Print List' → 'Logins'. In the dialog that opens, click the 'Save' button, specify a location and click the 'Save' button.
- In KeePass, open your KeePass 2.x database file and click 'File' → 'Import'. Choose 'RoboForm HTML' as format, select the HTML file that you have just saved and click the 'OK' button.
How to Import Data from Steganos Password Manager 2007
Warning! It is possible that the transfer fails and that KeePass accidently overwrites your existing passwords in Steganos Password Manager. Therefore, back up your SEF file before starting the import! In any case you should restore your passwords by restoring the backup you just created after the import process! Even if you think KeePass hasn't changed anything, restore from the backup!
Unfortunately Steganos Password Manager (SPM) lacks any form of export functionality. As the SEF file format (in which the data is stored) is proprietary and no specification is available, KeePass needs to try to get all the data out of the windows of SPM.
The import process works as follows. First you start SPM and open your password database. The main password management window should be open (i.e. the one which lists your items in the middle of the screen, and got toolbar-like buttons at the top). Make sure that all your items are displayed in the list (select the correct filter in the combobox above the item list).
Now switch to KeePass 2.x and open your KeePass database. Click 'File' → 'Import' and choose 'Steganos Password Manager 2007'. Click [OK]. Now read the rest before continuing.
After pressing the [Yes] button in the KeePass import confirmation dialog, you got 10 seconds to switch to the SPM window. Select the very first entry within the SPM window (but do not open it, just select it). This is important! The first entry must have the keyboard focus and must be selected.
When the 10 seconds are over, KeePass will start importing. You will see how KeePass opens the SPM items, copies the data, closes the item's window, select the next item, etc. Everything goes automatic now and you can just sit back and watch. Sometimes Windows playes a ding sound, this is normal.
Note that it can take quite some time to import your items. Do not do anything while KeePass is importing! One single mouse click or keypress can ruin the complete import process.
The last item will be scanned twice. When completed, KeePass will show a message "The import process has finished!".
It is possible that KeePass failed to import some items (mainly caused by SPM's unpredictable slow response times). It is highly recommended that you compare each of the entries.
How to Import Data from PassKeeper 1.2
The import process works visually, exactly like the import method for Steganos Password Manager data. Please read all instructions in How to Import Data from Steganos Password Manager 2007.
How to Import 1PW and 1Password Pro CSV
KeePass can import CSV files exported by 1PW and 1Password Pro. When exporting the data, make sure:
- Choose the tabulator (Tab) as field separator.
- The option for enclosing fields in quotes must be enabled.
- All fields must be exported, in the original order.
 Export: Option 'Additionally Export Parent Groups'
In KeePass 2.x, there is an option 'Additionally export parent groups' in the export dialog. If this option is turned on, the parent groups of the selected groups/entries are exported, too (all up to the root group of the database). Unselected groups/entries in parent groups are not exported.
If the selected file format does not support groups, the option has no effect. When exporting the whole database (via 'File' → 'Export') or the root group, the option is disabled, because the root group has no parent group.
Properties of the parent groups (icons, notes, auto-type settings, etc.) are exported, if the selected file format supports them. When importing a file, the properties of the groups in the current database may be overwritten by the properties of the groups in the file (depending on the import mode and the last modification times).
Example. Assume that the user selects the entry 'Entry B' that is stored in the groups 'Group 1' → 'Group 1.2' of a database.
 |
Root Group | ||
|
Group 1 | ||
|
Group 1.1 | ||
|
Group 1.2 | ||
|
Group 2 | ||
| Title | User Name | Password | URL | Notes | |
|---|---|---|---|---|---|
 |
Entry A | Michael42 | ******** | https://example.net/ | None. |
|
Entry B | Michael42 | ******** | https://example.com/ | None. |
|
Entry C | Michael42 | ******** | https://example.org/ | None. |
Exporting the selected entry (via 'Entry' → 'Data Exchange' → 'Export Entry') to a KDBX database file without turning on the option results in:
|
Root Group |
| Title | User Name | Password | URL | Notes | |
|---|---|---|---|---|---|
|
Entry B | Michael42 | ******** | https://example.com/ | None. |
In contrast, exporting the selected entry to a KDBX database file with the option turned on results in:
|
Root Group | ||
|
Group 1 | ||
|
Group 1.2 | ||
| Title | User Name | Password | URL | Notes | |
|---|---|---|---|---|---|
|
Entry B | Michael42 | ******** | https://example.com/ | None. |
